Imagine this: You enter a prompt, and your application starts taking shape before your eyes. Welcome to the brave new world of programming with GitHub Copilot agents. The principal behind agents:
GitHub Copilot’s new agent mode is capable of iterating on its own code, recognizing errors, and fixing them automatically. It can suggest terminal commands and ask you to execute them. It also analyzes run-time errors with self-healing capabilities.
Copilot’s agent mode is now available via VS Code Insiders. I decided to try it out by instructing it to create a Copilot Skillset, a simple Copilot extension that runs when explicitly called in Copilot Chat:
@skillset-name the prompt goes here
When invoked, Copilot evaluates the prompt and chooses an appropriate API to call. The request is sent, the response is processed, and the result appears in the chat. Unlike a full Copilot agent, a Skillset is only triggered when explicitly requested and there’s no continuous back-and-forth. This makes it ideal for straightforward integrations.
Building a Skillset with Copilot Agents
Time to put Copilot to work. I enabled experimental agent mode, and got started. The technology choices were mine, but I let Copilot handle the implementation. My first prompt:
Build a Python FastAPI application that serves a GitHub Copilot Skillset. Use Poetry for dependency management.
The application implements two endpoints:
One retrieves the top GitHub repositories based on star count.
✅ Poetry setup, FastAPI app, two working endpoints for GitHub and HN data
❌ Old Python version, Poetry install issues
Prompts required: 2
I forgot to specify that the endpoints should use POST. A quick correction:
Rewrite the endpoints to be POST endpoints. Move GET parameters to the request body.
✅ Fixed
Adding Signature Verification
Next, I needed to secure the endpoints with a signature check. Instead of writing it from scratch, I copied the relevant documentation and prefixed it with a prompt:
Implement a signature check to verify requests originate from GitHub.
All agent requests include X-GitHub-Public-Key-Identifier and X-GitHub-Public-Key-Signature headers.
Verify the signature by comparing it against a signed copy of the request body using the current public key at GitHub’s API.
Results:
✅ Correctly added dependencies, implemented downloading the public keys and performing the verification
❌ Assumed RSA instead of ECC, misinterpreted a property key
⭐ Bonus: Clear 400 response if headers are missing
Prompts required: 2 + 2 manual fixes
Defining the Skillset Schema
Copilot needs a JSON schema to describe the Skillset. Again, I copied the relevant docs and prompted:
Create a JSON schema for the two endpoints and save it as a JSON file.
Results:
✅ Two files with the correct JSON schema
❌ No issues
Prompts required: 1
Generating a Dockerfile
To containerize the application, I prompted:
Add a Dockerfile for building a container image of the application.
Results:
✅ Generated a mostly correct Dockerfile
❌ Used an incorrect Poetry install option (--no-dev), omitted --no-root, incorrect paths, unnecessary changes to pyproject.toml
Prompts required: 6 + 1 manual fix
Deploying and Testing
I deployed the container to my VPS and completed the GitHub App configuration using the JSON schema. On the first test, signature validation failed—Copilot had assumed RSA keys, but GitHub uses ECC. I replaced the verification logic with GitHub’s example code.
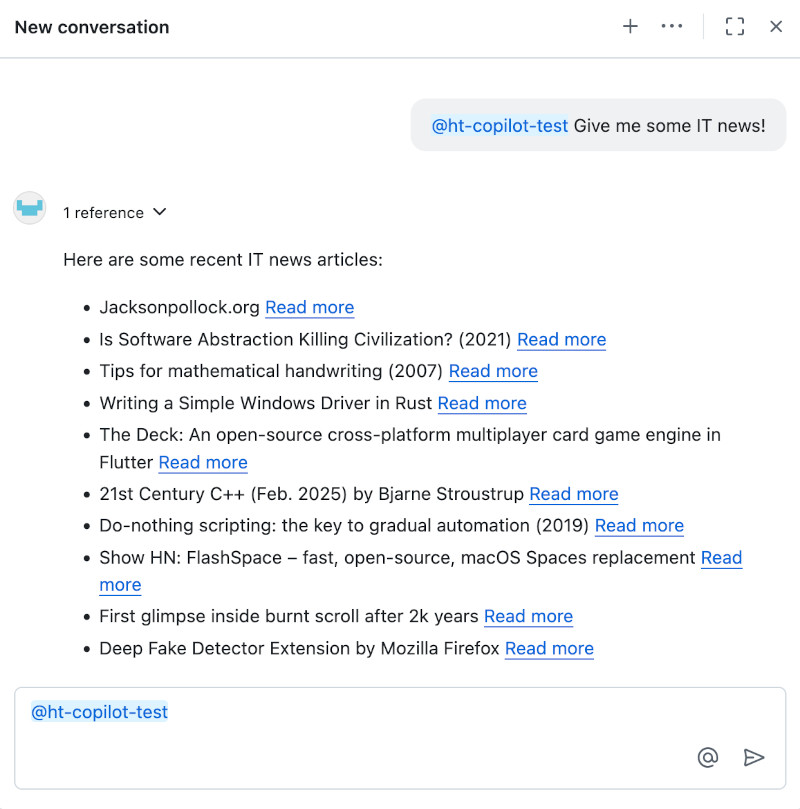
Success! After authentication, Copilot correctly routed a request for “IT news” to the Hacker News endpoint, retrieved the top stories, interpreted the JSON response, and displayed it as a list:
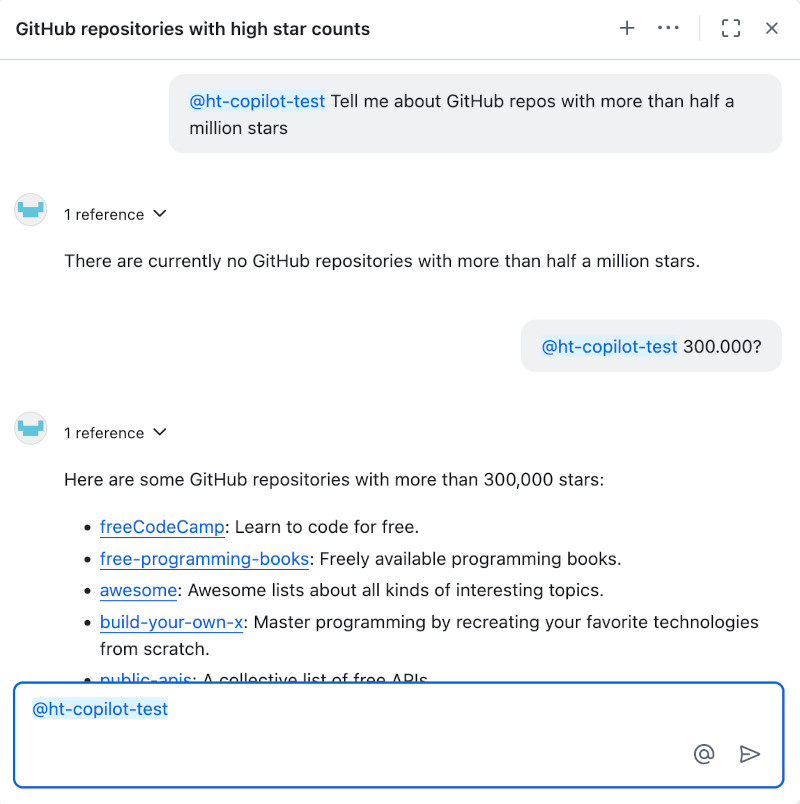
A request for GitHub repositories with a filter worked too—Copilot converted “half a million” to 500000, made the API call, and displayed the results:
Code Review and Final Thoughts
In my small test, Copilot handles assigned tasks relatively well. It’s like having a superfast assistant that prompts a model, searches the web, reads documentation, curates everything into working code, places it in the right files, and sometimes even tests it. It makes mistakes and unfounded assumptions, much like a human coder. The project structure it produces isn’t always ideal, and it doesn’t generate tests without asking. But with further prompting, these issues can be addressed.
Copilot agents significantly accelerate coding, yet they still require a human developer who understands software development principles, underlying technologies, and the libraries used. That said, Copilot also speeds up the learning process for these topics. Agents also have the potential to encapsulate more and more industry knowledge over time. For now, Copilot agents are able to perform some of the iterative steps that a human coder performs when developing a piece of software with LLM support. Copilot agents represent another step toward a future where most lines of code are written and tested by machines—while human developers provide guidance and refinement.
As a human experience, using Copilot agents feels more productive and less solitary than the “old ways” of coding, because of the conversational nature of the work.
Using Copilot does not impact my flow state negatively, although I feel like some of the meditative aspects of coding are lost. It just feels a bit like managing the machine,
instead of merely using it.
Lambda function URLs not only provide a very fast and easy way to build HTTP endpoints, but also provide streaming functionality to these endpoints. Unfortunately, as soon as we use any kind of buffering reverse-proxy like AWS’s own Application Load Balancer or API Gateway, streaming responses do not work.
The simplest way to use Function URLs with streaming responses, is to use the provided URL directly. Security challenges like DDoS protection and firewalling aside, this also poses a service discovery challenge whenever a Function URL changes. This may happen if we tear down a Lambda function and recreate it.
To provide a more stable interface to our Function URLs, we must provide a service discovery that is more stable in its configuration than our Function URLs. Storing our service catalog in a JSON containing the current Function URLs that can be pulled and utilized by our application may suffice for simple use cases. Such a JSON can simply be distributed via S3 Static Website Hosting. The only infrastructure component that must remain stable in this scenario is the name of the S3 bucket storing the service catalog and the region of the S3 website endpoint.
In order to generate the JSON file used for service discovery, we create a Lambda function (I use Python) that iterates over a list of Lambda function names, pulls the Function URLs via the AWS API, creates a JSON and saves it to the S3 bucket:
AWS has deprecated the Go runtime for its Lambda service. The good news is that there are serious performance benefits associated with using a custom runtime based on Amazon Linux 2, especially when it comes to cold starts.
I typically write small helper and API functions for personal projects in Node.js and Python. Given the recent improvements and my appreciation for Go’s elegance, I see little reason not to write my next functions in Go. AWS even provides a lib for that. So, here we Go (pun intended).
One of my pet projects is a nutrition app that works with OpenAI APIs to estimate the nutritional content of meals by text description and picture. I migrated the functions of that project to Go. I invoke them via Lambda function URLs in order to provide a simple API. Here is the boilerplate code I wrote for this. The example function receives a POST request and returns the “message” field from the POST body ({ “message”: “Hello World!” }) in its response. Replace this with your own logic.
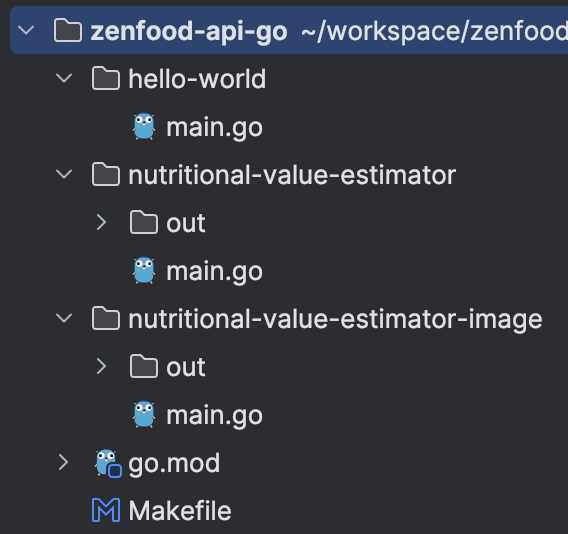
My project includes multiple Lambda functions. I have organized these using the following directory structure: each subdirectory contains the code for one Lambda function.
The custom runtime requires that the compiled binary be named “bootstrap” and placed inside a ZIP file. To execute tests, compile the binary for the Amazon Linux 2 platform, and package the ZIP file, I wrote a small Makefile:
# Variables
GOOS=linux
GOARCH=amd64
DIRS=nutritional-value-estimator nutritional-value-estimator-image
BINARY_NAME=bootstrap
ZIP_NAME=lambda-handler.zip
# Default target
all: test $(addsuffix /out/$(ZIP_NAME),$(DIRS))# Rule for running tests
test: @echo "Running tests..." @go test -v ./...
# Rule for building Go binaries
%/out/$(BINARY_NAME): %/main.go
mkdir -p $(dir $@) GOOS=$(GOOS) GOARCH=$(GOARCH) go build -o $@ $<
# Rule for zipping the binaries
%/out/$(ZIP_NAME): %/out/$(BINARY_NAME) cd $(dir $<)&& zip $(ZIP_NAME)$(BINARY_NAME).PHONY: all test
The makefile produces a file “lambda-handler.zip” in the out directory of each subdirectory, ready to be uploaded to AWS Lambda, or deployed via IaC. This results in an ultra-fast Lambda function with a cold start time of 65ms and a subsequent runtime of just 1ms.
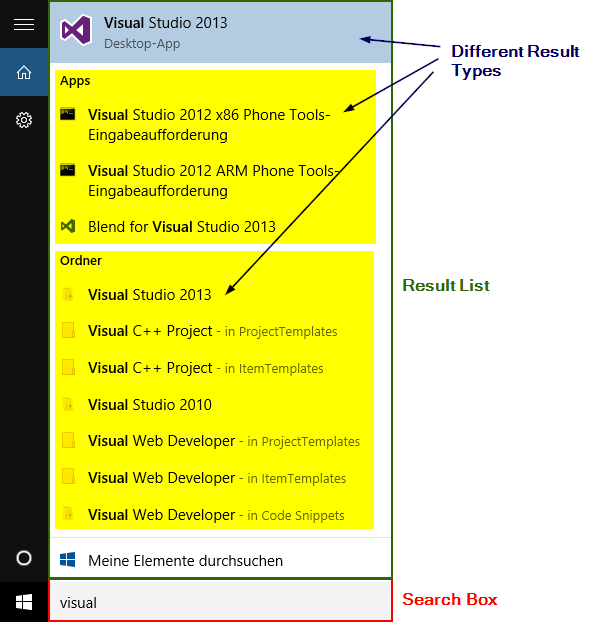
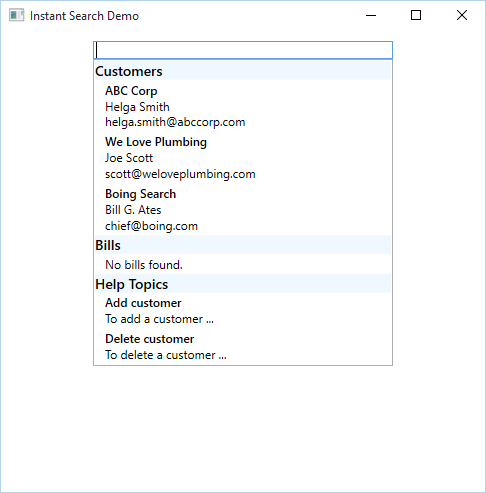
In this tutorial we will implement a search box that displays search results or suggestions as soon as a search term is entered (“instant search”). The solution can easily be modified to search after the return key has been pressed or a search button clicked. The result/suggestion list should support different types of results and grouping of results. The implementation should look similar to the start menu search in Windows 10:
Search Box Basics
First the UI elements have to be defined in WPF and bound to properties of the ViewModel (I assume you use the MVVM-pattern for your application, as recommended for WPF). The search box is a simple TextBox, the results will be displayed underneath it in a Popup. We define the UI elements as follows:
“UpdateSourceTrigger=PropertyChanged” in the TextBox.Text Binding ensures, that the property in the ViewModel is updated as soon as a key is pressed. The “IsOpen” Binding on the Popup opens the Popup as soon as the TextBox has the focus.
Now we want to insert the result list into the Popup. The search results will be displayed in a ListView defined in WPF. The ItemsSource will be bound to an ObservableCollection in the ViewModel that contains all the result items. We want to support element grouping and different data types. For that we first have to think about the data structure behind our search results.
Let’s say we have an application that contains customer data and help topics we want to find. These are our result groups that will be identified by their group title. Because we want to display the data differently we implement the two data types “CustomerResultItem” und “HelpResultItem” and a third data type “ErrorResultItem” for displaying a “no results” message. All three derive from “ResultItem” which contains the group designation. We implement the following classes with a few exemplary properties:
We create the property in the ViewModel to which we will later bind the ItemSource of the ListView:
public ObservableCollection<ResultItem> SearchResults { get; set; }
And fill it with a few items in the constructor of the ViewModel, just for testing (note that the first parameter of each result item instantiation is the group name that will be displayed in the result list):
SearchResults = new ObservableCollection<ResultItem>();

SearchResults.Add(new CustomerResultItem("Customers", "ABC Corp", "Helga Smith", "helga.smith@abccorp.com"));
SearchResults.Add(new CustomerResultItem("Customers", "We Love Plumbing", "Joe Scott", "scott@weloveplumbing.com"));
SearchResults.Add(new CustomerResultItem("Customers", "Boing Search", "Bill G. Ates", "chief@boing.com"));

SearchResults.Add(new ErrorResultItem("Bills", "No bills found."));

SearchResults.Add(new HelpResultItem("Help Topics", "Add customer", "To add a customer ..."));
SearchResults.Add(new HelpResultItem("Help Topics", "Delete customer", "To delete a customer ..."));
Search Result List
It’s time to finally add the result list to the search popup we created in step one. The WPF definition of the TextBox and the Popup now looks like this:
In Popup.Resources we tell .NET to group the items in SearchResults by their group name. We then set the grouped collection as ListView.ItemsSource. In ListView.Resources we define templates for the various ResultItem objects and the group header. The ListView now looks like this:
Update Results
We have to update the result list when a key is pressed in the search TextBox. We have bound the TextBox.Text property to “SearchText” in our ViewModel. We can simply extend the setter in the ViewModel to update the result list. I recommend starting an async task that for example queries the database and returns a List of ResultItems. For the tutorial I just create lists of items when the ViewModel is initialized and add items to the result list in the setter of SearchText. The ViewModel looks like this:
publicclassMainWindowViewModel {
List<CustomerResultItem> _allCustomerResultItems;
List<HelpResultItem> _allHelpResultItems;
string _searchText;
publicstring SearchText
{
get {
return _searchText;
}
set {
_searchText = value;
SearchResults.Clear();
foreach(CustomerResultItem item in _allCustomerResultItems) {
if(item.CompanyName.ToLower().Contains(_searchText.ToLower())) {
SearchResults.Add(item);
}
}
foreach (HelpResultItem item in _allHelpResultItems)
{
if (item.Title.ToLower().Contains(_searchText.ToLower()))
{
SearchResults.Add(item);
}
}
}
}
public ObservableCollection<ResultItem> SearchResults { get; set; }
public MainWindowViewModel()
{
SearchResults = new ObservableCollection<ResultItem>();
_allCustomerResultItems = new List<CustomerResultItem>();
_allCustomerResultItems.Add(new CustomerResultItem("Customers", "ABC Corp", "Helga Smith", "helga.smith@abccorp.com"));
_allCustomerResultItems.Add(new CustomerResultItem("Customers", "We Love Plumbing", "Joe Scott", "scott@weloveplumbing.com"));
_allCustomerResultItems.Add(new CustomerResultItem("Customers", "Boing Search", "Bill G. Ates", "chief@boing.com"));
_allHelpResultItems = new List<HelpResultItem>();
_allHelpResultItems.Add(new HelpResultItem("Help Topics", "Add customer", "To add a customer ..."));
_allHelpResultItems.Add(new HelpResultItem("Help Topics", "Delete customer", "To delete a customer ..."));
}
}
And here is the result of the implementation:
Handle Clicks
In order to handle clicks on a result item the SelectedItem property of the ListView has to be bound. The XAML declaration of the ListView now looks like this: